Before anything, if you’d like to learn more about mixing, here’s a great book I’d like to recommend. It’ll explain what different tools actually do to the sound and will help you make better mixing decisions. Check out the preview here: The Art of Mixing: A Visual Guide to Recording, Engineering, and Production
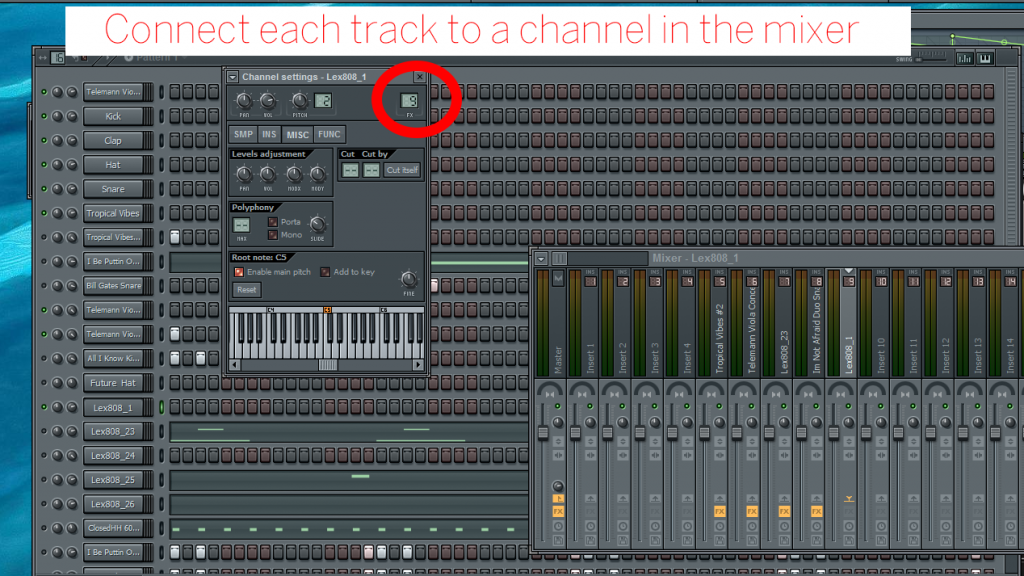
The first thing you need to do is make sure each track in your song is connected to a separate channel in the mixer.
This is the most important part of exporting stems in FL Studio and you should do this slowly and carefully.
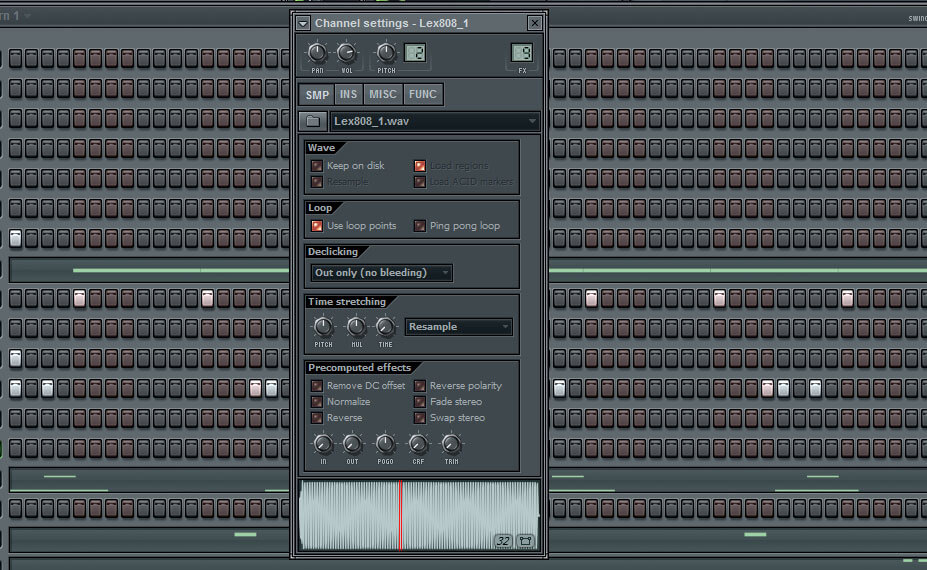
In the image below, you can see we’ve connected this track named “Lex808_1” with channel 9 in the mixer.
To do this all you need to do is click on the track and on the box on the right labeled FX, change the number to a free channel on the mixer.
Now you just have to connect every track to a different channel in the mixer.
Pro-Tip
A good idea is to give each track its own channel in the mixer and don’t send two tracks to the same channel unless you’re consolidating them (for example the vocals), which we’ll explain how to do next.
Don’t worry it’s really easy.
How to Consolidate Vocals For Export in Fl Studio
When I say consolidate the vocals what I mean is separate the main vocals, ad-libs, doubles, chorus lead, chorus backing, and chorus ad-libs into their own tracks.
So when it’s all said and done, you’ll have these tracks all in separate WAV forms.
Main Vocals
Ad Libs
Doubles
Chorus Lead
Chorus Backing
Chorus Ad Lib
For example, you can send the main vocal for verses 1, 2, and 3 to the same channel in the mixer.
You can then do the same for the other vocal tracks as well (send them to their own channel in the mixer).
This way when you export them there will be one track with all your main vocals in it, one track with all the backing vocals in it, one track with all the main chorus vocals in it, you get the idea.
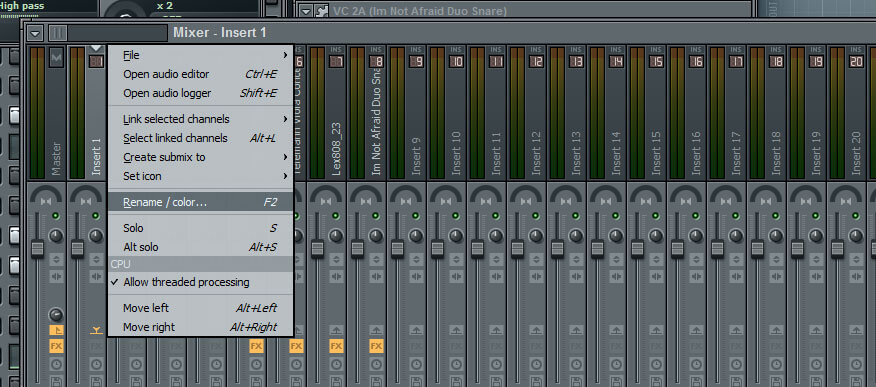
Another good thing to do is name each track correctly.
For example, if you have a main vocal track, name it “main vocal” in the mixer by right-clicking on the channel and going to rename it.
This way it’ll be easier for you to assign tracks to the correct channel and when the file exports it’ll be called “main vocals”.
Also, your audio engineer will love you because you saved him time from organizing your stems.
Export Stems
Now you go to File > Export > Wav file
Next, a dialog window will pop up asking you to name it and save it.
The beat I’m exporting is called “Tropical Trap” (don’t ask me why I named it that).
This is where you’ll want to create a new folder and name it your songs name.
You can right-click and go to “Create new folder” and then you can name it accordingly.
I will usually title the folder the song’s name and put (stems) beside it.
For example, if the song is called “Tropical Trap”, I’d have a folder called “Tropical Trap (stems)” and it would contain all the exported stems from Fl Studio in it.
Don’t forget to select this folder and click “save” as this is where you’re telling FL Studio to export your stems.
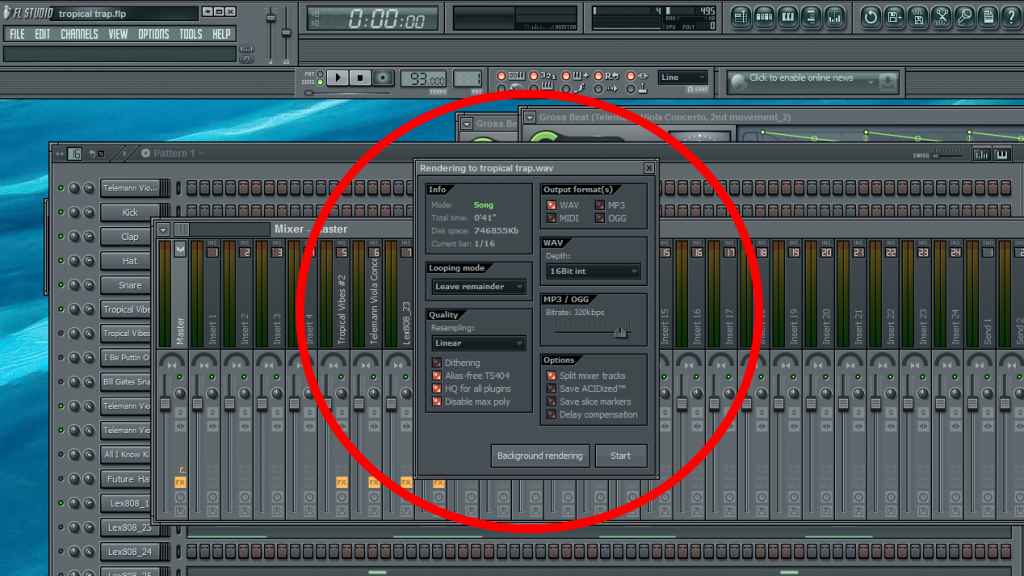
The Final Part
Finally, this window will pop up, all you need to is select “Split mixer tracks”.
You can also copy the same settings I have used here as well.
Once you’ve done that, click “Start” and let the magic happen.
If you’ve done everything correctly, you’ll have a folder with all the tracks from your song separated.
Exporting Stems Mistake: Don’t Worry Everyone Does This
A common problem, I still do even to this day, is forgetting to link one track to its own mixer channel, so it’ll be missing from the folder! Ouch.
Remember up above I said to do it slowly and carefully.
You can double-check to make sure every track from your song is in the folder by exporting your tracks back into your recording program and making sure they’re all there and lined up correctly.
As an engineer for 10 years there are some things I’ve been able to learn over the years. There are several things I can advise you as a beginner to avoid, but I’m just going to share the top 7, in no particular order.
1.Something From Nothing
The first thing to avoid is trying to turn sound into something it isn’t. Even as an engineer with years of experience, I am very careful with doing this. Why? It can take a lot of time and if it is not done right it tends to sound unnatural. Without experience, this particular feat is quite difficult, BUT this is not to say that you should never try this, you should. Get creative. We live in a digital age where anything is possible. Just don’t beat yourself up over it, let it be fun until you get the hang of it.
The problem with trying to get something from nothing is that you can spend hours or even days on trying to get it “perfect”. A lot of the times, the sound that’s there is going to be the sound. The key to mixing professional mixes is how good you can get the work to sound within in a given set of time. Some projects only have a budget for a few days, some only a few hours. Speed is a matter of knowing what your doing. The more you do it, the better you’ll know your tools and how to get something to sound the way you want it to. It comes around full circle though, if you don’t experiment you’ll never know how to get from Point A to Point B.
2. Dip your Toes In
Putting reverb on every track is something producers tend to do in fear of having a dry signal. It is important to know which reverbs belong to particular genres and trends. Limiting yourself to as few reverbs as possible can help you grow the most. This can be true for other effects too. Simplicity is key and less is more in some of these situations. Too much reverb causes problems all across the board so instead of getting your mixes to swim in reverb, it’s better to just dip your toes in.
3. Han Solo
Working in solo for too long is another mistake a young engineer can make. It can cause you to lose perspective quite rapidly when you are mixing single sound. Of course, working in solo is necessary to work on specific details, but as far as doing it for everything, it’s just not the best idea. Remember that the mix is about getting everything to work together. If you listen to something in solo, you may find that it doesn’t sound “good” on it’s own. That’s not a bad thing. Remember you want everything to work together.
*Extra Tip: If you’re working on an analogue console, the solo bus is not even the same circuitry as the main LR. If you solo something you’re not listening to it go through even the same path as everything else.
4.The Bigger Picture
Utilizing too much processing on a track is one of the biggest beginner mistakes made. This is something that takes time and skill to develop. It requires you to take some free time to mess around with it in order to get good enough to implement it into your more serious mixes. Basically, you need to develop your method before you get mad with it.
The problem with going in guns blazing is there’s more problems to fix toward the end. It’s basically like pushing the faders up instead of pulling them down. Before you know it, your destroying your master.
It’s best to be deliberate with everything you’re doing. Everything needs to make sense for the bigger picture. You need to be thinking about processing power (if you’re running a slower machine), important elements that need or don’t need a lot of processing, what elements are UN-necessary, and when the mix should or shouldn’t be balanced.
5. Clarity
Clarity is something that is essential in any industry. It is important to know what you want to. Take time to stop and think about what it is that you are trying to accomplish. In my experience, this saves frustration and time down the road.
6. A Mix is NOT a Master
Going for a mastered sound is something that is easy to fall into. There’s nothing wrong with wanting a fully polished record right from the get-go. This is another one of those things that requires time and experience in order to master. Getting the hang of perfecting the little details should be a greater focus before jumping into mastering. When you feel confident with your mixes, start diving into mastering. Unless you feel you’ll never be good at mixing, jump straight into mastering, but whatever you do stick with it. Either one of the two professions will take years to develop.
7. Don’t Smile Too Often
Adding tons of bass and treble is the last mistake I’ll mention (the smile curve). These should be treated as sprinkles on a cupcake – they shouldn’t overwhelm the track. They can translate poorly on speakers and can fatigue the ear. Unless you know in your bones that the track calls for it, don’t feel the need to do it.
Bonus Tip:
If you don’t have a well treated room, get yourself a great pair of reference headphones to mix on. You’ll be better off mixing on those than any untreated room with the best and most expensive studio monitors. I’ve mixed and mastered countless records on the road, in airports, and in hotel rooms on great headphones. All of which released through major labels. It’s the ear, not the gear.
Let’s talk about audio splits and stems and what we can do with them on Premiere Pro. Audio stems are a collection of audio sources mixed together. They are audio files but the significance of calling them stems is that they collectively make sense for the project. They are essential for transporting files and basically they make an engineers life easier. Audio splits are a separation of the final mix into smaller more discrete audio elements. These stems come in handy when you want to replace some elements like dialogue in a project without having to go back into the original audio project and mess around with it to get what you want. To make it easy, it is best if you have 6 mono tracks (3 stereo stem tracks) for left and right sound effects, dialogue and music. When it comes to 5.1 surround mix, sports or comedy shows you will end up with a lot more tracks and other variations. For example, in comedy shows the laugh track is isolated as a stem. So depending on the case, you may end up with with a few DME tracks or a single M&E track in stereo.
If you do work in entertainment programming, short films, commercials or corporate videos, then this should be common practice. If you do it while you are in the works of a specific project, then later down the line it WILL make your life easier. Although it is possible to go back to your files and do it later, it just saves time (time = money, people!).
So now it’s time to set up your new Premiere Pro sequence. For generating a multichannel master file with isolated DME stems in FCP X, we use the Roles function. In order to do this you need to ensure that the proper Roles is assigned from the start of your project. If you do this for the sound effects, music and dialogue Roles, then the stems will self-sort when you export them. It all comes down to how you route a Role to the channel that it corresponds to.
When we look at audio editing and mixing, Premiere Pro CC’s is also a good tool to use and the process is pretty easy. Just like I mentioned earlier though, you have to set up the proper sequence designed for the type of audio work you are working with. Correspondence is MAJOR KEY (thanks Dj Khaled). And just like I mentioned before, doing it right from the beginning will save you a headache and a trip to the quick mart to pick up some eye drops and a coffee.
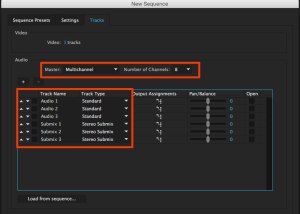
Okay, so the first thing you want to do is create a custom preset. Presets are designed with a certain number of tracks routed to a stereo master output and thus you will have a 2-channel file when you export. You’re gonna want to change the track configuration to multi-channel and then set your number of output channels. Next, you’re gonna want to add the number of tracks you need and assign the regular tracks as “standard” or “stereo submix” for the submix tracks. The more complex the project, the more regular tracks it contains – and of course this all depends on the type of work you are doing with dialogue overlapping, sound effects or music on the timeline. Some sound engineers like to have what they call “zones” for the different types of audio. For this you would just have a certain amount of tracks for the dialogue, another amount for the music, and another for the sound effects – depending on the length of your timeline. To make for easy recognition and organization, it’s smart to rename your submixes according to what they contain. For example DLG for dialogue, or SE for sound effects. One cool feature about Premiere Pro is the ability to mix audio in several different places. You can do it in the audio track mixer or the clip mixer. To work with the audio track mixer, go to it and assign the routing and channel output (this can also be assigned in the sequence preset panel). For each of the regular tracks, it would be a good idea to set the pulldown for routing to the corresponding submix track, this way all of the submix tracks are routed to the Master Output.
Lastly, you’re going to want to assign the proper channel routing. This is so the sequence preset you created will contain the full mix in the first and second master channels. To do this you need to export a 2-channel file as either a review copy or a master file (only the first 2 output channels are used by default, which means these will always get the mix without you having to do anything). Next you’re going to want to enable stereo monitoring for the stereo stems. Since channels 1 and 2 are the default, you’re going to need to make some changes in order for this to happen. To enable this, you are going to need to assign the channel output in the following format: Dialogue (Submix 1) to 1-2 and 3-4, Sound Effects (Submix 2) to 1-2 and 5-6, and Music (submix 3) to 1-2 and 7-8. The reasoning behind this is that everything is going to go to both the full mix and the the isolated stereo channel for each of the audio components.
Okay, so now that the hard part is over, it’s time to edit the custom timeline. For this you simply edit any of the dialogue clips to track one, sound effects to track 2, and music to track 3. If you are working on a more complex project, then what you would work with are the “zones” I referred to earlier. For example, if 1-8 are routed to the dialogue submix track, then all you would do is edit the dialogue clips to tracks 1-8. And the same goes for the others.
Now it’s time for export. This needs to be done correctly or else all of your hard work goes to waste. To do this there are a few good choices: a QuickTime ProRes files or the MXF OP1a choices. In the export settings panel there is an audio tab, you’re gonna want to change the pulldown channel selection from stereo to 8 channels. With this you’re gonna have your timeline output channels exported as a separate mono track in the file. Now you have everything in one single, neat file, you have the final image and mix in one neat file as well as your isolated stems that can make easy changes later on. If you are a little paranoid like I am and you want to future-proof your project, you’re gonna want to save and export some extra versions with and without titles.
Let’s suppose the day for you to reuse the file has arrived. You’re going to want to import this file back into Premiere Pro. Since the channel structure is going to be read as 8 mono channels, you’re going to need to modify the file simply by using the Modify-Audio Channels contextual menu and right-click the clip. Simply change the clip channel format from Mono to Stereo. This is going to change the 8 mono channels into 4 left stereo channels and 4 right stereo channels.
If you’ve made it this far, congratulations. If this helped, thank me later. Looking forward to next time, Chris.
With this simple piece of software, you’ll definitely get started on the right path to success, but exporting stems can be tricky. It doesn’t have a feature that will allow you to export multiple stems at the same time, so I’d recommend a cup of coffee and a lot of patience. If you haven’t read our blog about what stems are and why you’d need to export them for mixing and mastering, you can find that here: https://recordat411.com/how-to-prepare-your-song-for-mixing/
Thankfully we’re here you walk you through it.
Let’s get started:
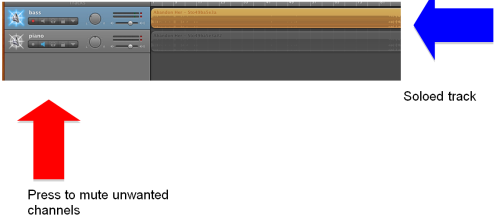
Step 1: In the window that contains all your tracks, you’re going to need to press the speaker icon on all of the tracks you want to mute. With this, you are ensuring that the only file heard is the file you want. The orange-colored track is the one that is going to be heard while the grey-colored tracks are not.
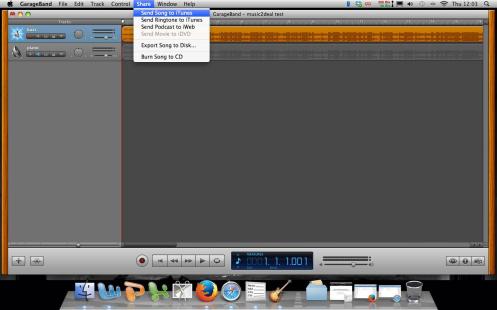
Step 2: To export your track, press ‘Share’ and then select ‘Send Song to iTunes’ from the top menu in Garageband
Step 3: When you do this, a menu is going to pop up that allows you to name your playlist and tend to other details. After filling it out, click ‘Share’
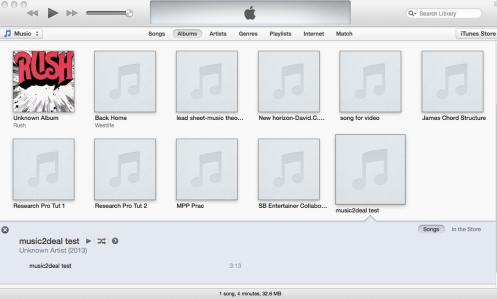
Step 4: Now iTunes appears, you can scroll down and find the name of your playlist
Step 5: After finding you have found your playlist and it opens, it is going to show you the tracks that have just been bounced. You should be able to see that the track defaults have the same name as the playlist. A good idea would be to rename each track as soon as you bounce them to avoid confusion down the line.
Step 6: To change the name of the track, simply click on the current name until the cursor appears. After renaming your track, press enter on your keyboard.
Step 7: Repeat until all of the individual tracks are in the playlist.
And you’re done, my friends.
This is quite a simple feat, but for new producers, it’s just about getting your feet wet and listening to your own work as a professional file.
This week I want to answer a question that has come up a few times recently and that is what type of computer do I use, what are the specs and what to consider when making an upgrade.
Getting a great mix has so much to do with tracks that are recorded well. Taking the time to ensure that you get well-recorded tracks makes all the difference in the world.